In previous posts I covered projects that use your computer as a server for other devices. This can be either a VPN server like we covered here or just use your computer to stream your media library when you are out and about.
When you’re inside your home network, most things will work fine. But some apps, if you want to access them when you’re outside your network, make things significantly more complicated. This is where Port Forwarding comes in.
Let’s start by looking at why that is and how port forwarding works.
How your router and ports work
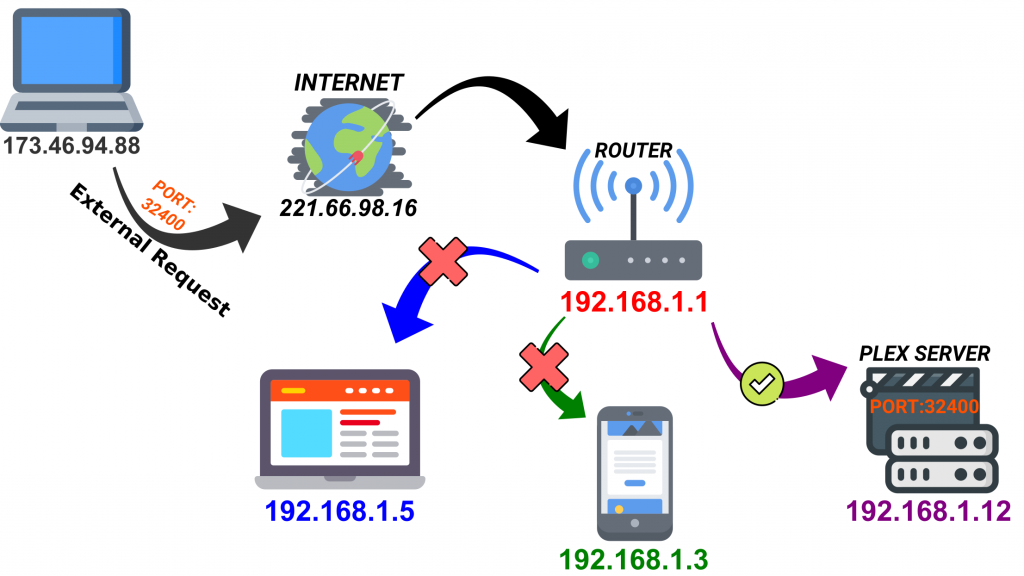
Here’s a map of a simple home network. The cloud icon represents the internet and your public, Internet Protocol (IP) address. This IP address represents your entire network from the outside world (your address on the internet).
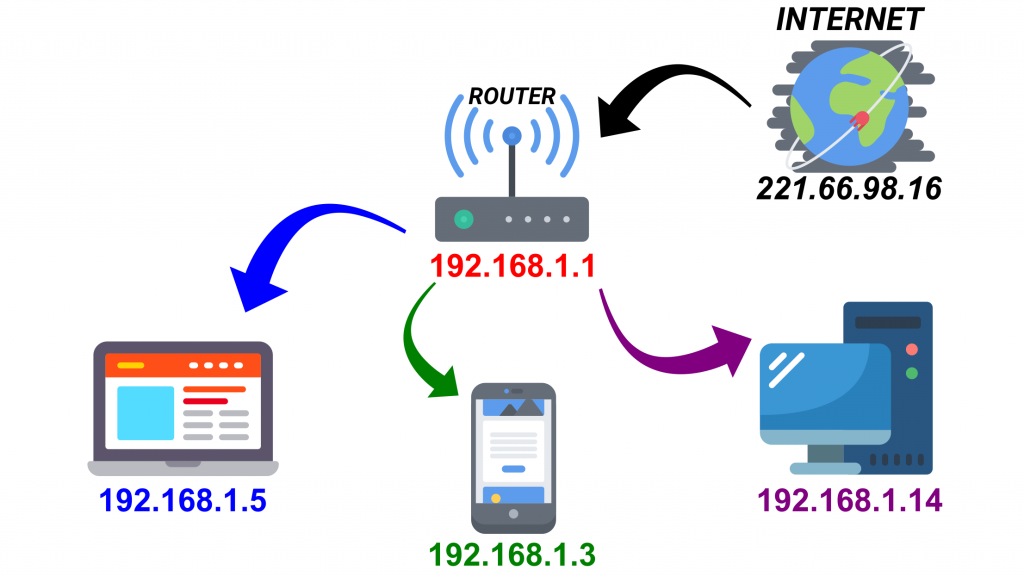
The red address 192.168.1.1 is the router address within your network. The additional addresses all belong to the devices connected to your router as seen at the bottom of the image. If your public IP address is like a street address, think of the internal IP addresses like apartment numbers for that street address.
◉ So how does the information from the internet reach the right device inside the network?
If you visit a web page on your laptop how does it end up on your laptop and not your phone if the public IP address is the same for all devices on your network?
This is thanks to a bit of routing magic known as a Network Address Translation (NAT). This function occurs at the router level where the NAT acts like a traffic regulator, directing the flow of network traffic through the router so that a single public IP address can be shared among all the devices behind the router. Because of the NAT, every device on the network can request web sites and other internet content simultaneously and it will all be delivered to the right device.
◉ What do ports have to do with anything?
Back in the early days of networking, when computers could only run one application at a time, all you had to do was point one computer at another computer on the network to connect them together as they would be running the same application.
Once computers became sophisticated to run multiple applications, early computer scientists had to tackle the issue of ensuring applications connected to the right applications. Thus, ports were born.
Some applications have their specific ports which are considered standards throughout the IT industry. For example, when your computer visits a website on the internet it uses port 80. The computer’s software knows that port 80 is used for serving http documents, so it listens there and responds accordingly.
Not all ports have pre-assigned uses, and you can use them for whatever you want. To avoid interfering with other standard-abiding applications however, it’s best to use larger numbers for these alternate configurations.
For example, Plex Media Server, as we covered in this post, uses port 32400.
Each port can be used via either TCP or UDP. TCP, or Transmission Control Protocol, is the most common of the two. UDP, or User Datagram Protocol, is less widely used in home applications with one major exception: BitTorrent. Depending on what is listening, it’ll be expecting requests to be made in either one or the other of these protocols.
So, what’s next?
While some applications take advantage of NAT to set their own ports and handle all the configuration for you (should be the case for most Torrent clients), there are still plenty of applications that do not.
Let’s see a real-life example below to better understand why port forwarding is needed.
Say you have set up a Plex Server to manage your media library. You are away from home, but you need to catch up on your favorite TV show. How do you accomplish that?
If you simply plug your home public IP address and the port you are trying to access (32400 as noted above) into your browser (i.e. 127.34.73.214:32400) you’re out of luck. The browser doesn’t take advantage of those advanced router features we just mentioned. It won’t know where to send your request, and nothing will happen.
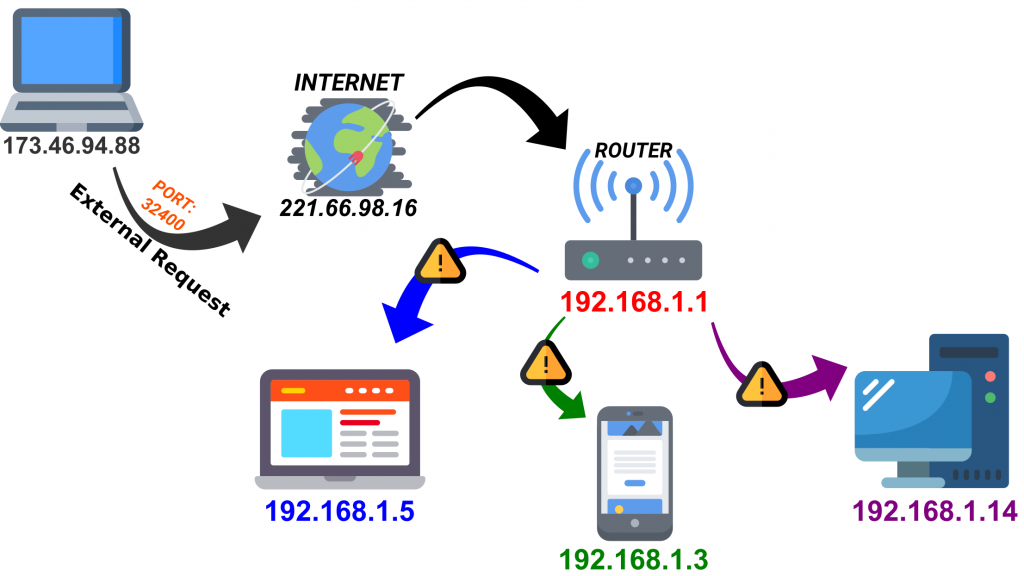
This is a security feature and is like that by design. If someone tries to connect to your home network and they are not using a valid port, you want the connection to get rejected. That’s the firewall element of your router doing its job: rejecting unwelcome requests. If the person trying to access the network, however, is you, then the rejection isn’t so welcome, and we need to do a little tweaking.
To solve this issue, you need to tell your router “when I access you with this program, you’ll need to send it to this device at this port”. With those instructions in place, your router will make sure you can access the right computer and application on your home network.
Considerations Before Configuring Your Router
There are a couple things to keep in mind before sitting down to configure your router that will make the process a whole lot easier.
1. Set Static IP Address for Your Devices
First and foremost, all your port forwarding rules will fall apart if you’re assigning them to devices with dynamic IP addresses assigned by your router’s DHCP service.
What does that mean? Well, your router has a pool of addresses that it reserves just for handing out to devices as they join and leave the network. Under normal circumstances this is fine. Your phone for example doesn’t care which internal IP address it was assigned by the router. But if you’ve created a port forwarding rule that says your Plex server is at a certain IP address and then the router gives it a new one, that rule won’t work, and you will no longer be able to connect to that server.
In order to avoid that, you need to assign a static IP address to each network device you’re assigning a port forwarding rule to. The best way to do that is through your router’s settings using each device MAC address (unique hardware ID). See this post on how to do this.
2. Know Your Public IP Address (and Set a Dynamic DNS Address)
In addition to using static IP assignments for the relevant devices inside your network, you also want to be aware of your external public IP address (the one assigned to your house by your ISP) — you can find it by visiting whatismyip.com.
Although it’s possible you might have the same public IP address for months or even over a year, your public IP address can change (unless your internet service provider has explicitly given you a static public-facing IP address). In other words, you can’t rely on typing in your numeric IP address into whatever remote tool you’re using.
I highly recommend you set up a Dynamic DNS service which will allow you to link your (changing) home Public IP address to a memorable address like myhomeserver.ddns.net.
The process is quite simple. Just visit www.noip.com, sign up for an account and follow the instructions to set up your DNS service. The service is free if once a month you just confirm and renew your hostname. There are also paid services which are more set and forget but for the tutorials covered in this blog the free service is more than enough.
Configuring your Router
it’s finally time to set everything up, and now that you know the basics, it’s pretty simple.
As much as I would like to provide exact instructions for your exact router, the reality is that every router manufacturer has their own software, and even how that software looks can vary between models. Rather than attempt to cover all routers, l will give you some examples to get an idea what the menu looks like and I encourage you to look up the manual or online help files for your router to find the specifics.
In general, you’re going to be looking for something called—you guessed it — “Port Forwarding”. You may have to look through the different categories to find it.
In the example below I will show you the steps on the router provided by my ISP.
Note: If you have your own router in addition to the one provided by your ISP then note that you will have to enable port forwarding on both routers. You need to forward all the ports for the various services you need on the ISP router to the IP of your own router. Then you need to forward the ports again on your own router to the IPs of the various devices connected to that router.
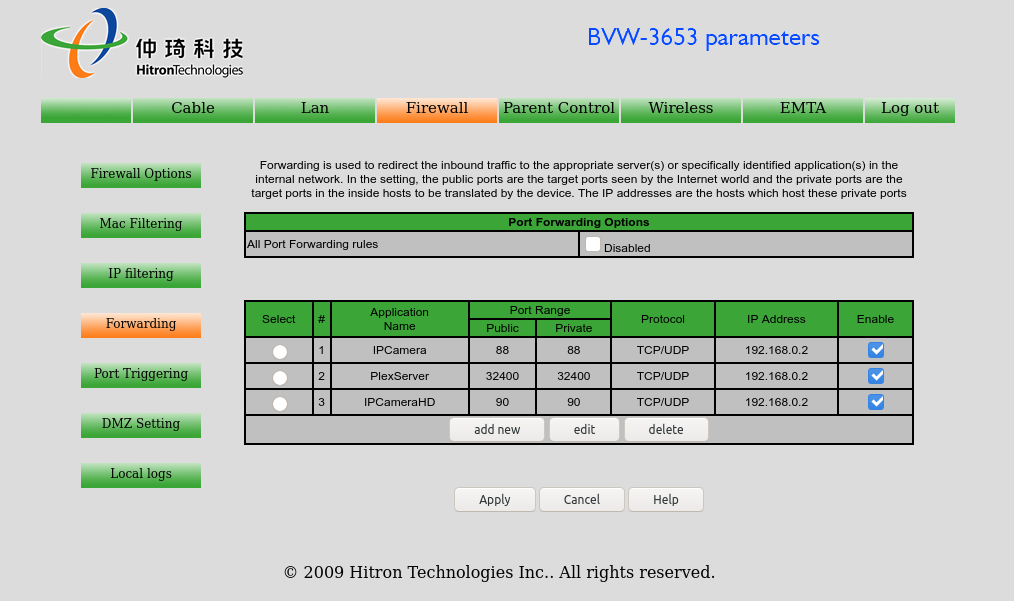
In the example above the ports are forwarded from the router provided by my ISP to the wireless router I have in my house (192.168.0.2).
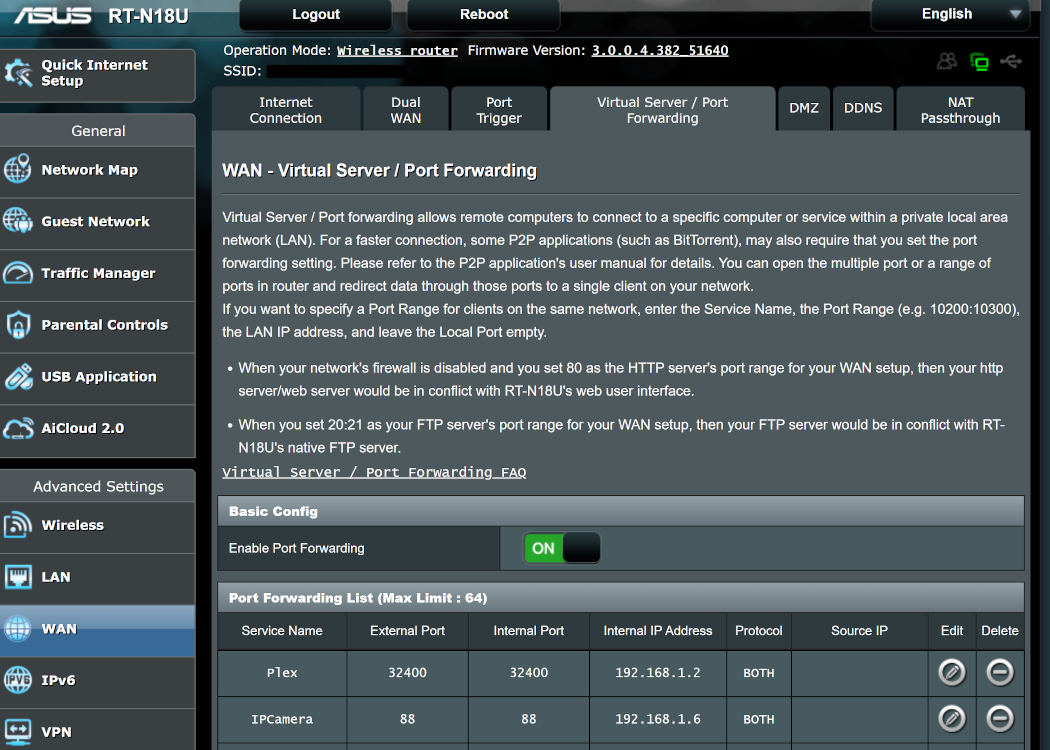
From there you just follow the steps below to forward the ports again to the device that you mean to access.
Step 1
Locate the Port Forwarding section in your router. Usually found under the WAN or Firewall section of your router.
Step 2
Create a new Port Forwarding rule. In this example we will cover how to set up the port to access your Plex server.
Step 3
Test your Port Forwarding rules.
For Plex you can open your Plex Server, navigate to the settings and find the network option. There the application will automatically refresh to verify that access outside the network is enabled. If everything is set up correctly you should see a green check mark next to the port number.

For all other services thankfully, there’s a handy little port checker available online at YouGetSignal.com. You can test to see if your port forward took simply by having the port tester try to connect to it. Plug in your public IP address and the port number and click “Check”.
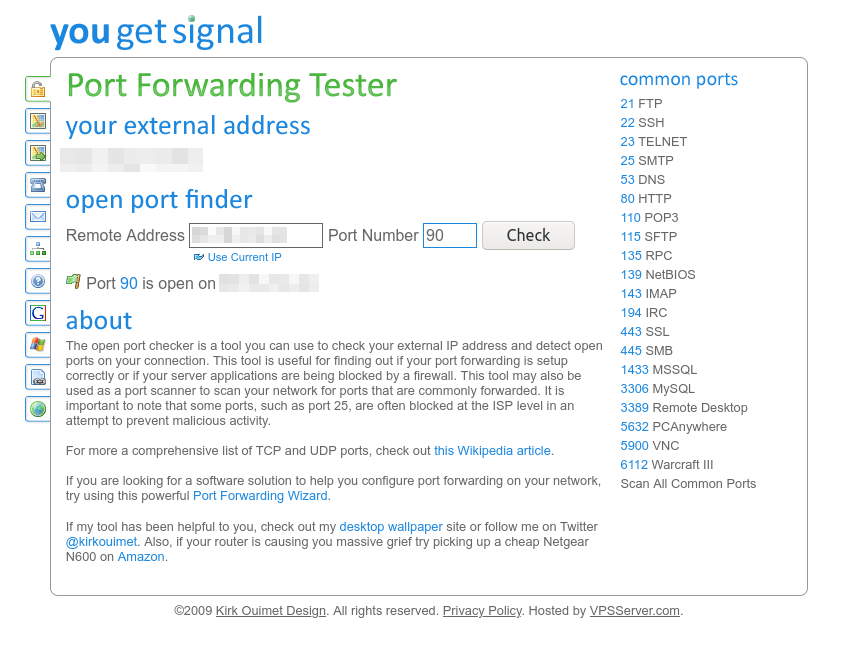
You should receive a message, as seen in the picture, like “Port X is open on [Your IP]”. If the port is reported as closed, double check both the settings in the port forwarding menu on your router and your IP and port data in the tester.
It is a bit of a hassle to set up port forwarding but as long as you have assigned static IPs to your devices and used a Dynamic DNS Service for your public IP you only need to set everything once and you should enjoy hassle free access to your network in the future.