Recently the fourth generation of the Raspberry Pi was released which brings many welcome upgrades to the great mini computer, such as a faster 1.5GHz clock speed processor, more RAM and 2 USB 3 ports.
If you are interested in picking one up, good news is that they are stupid easy to setup and you can make a great deal of awesome projects with it.
What is a Raspberry Pi?
The Raspberry Pi is a small, $35 computer. It was created by the Raspberry Pi Foundation to get computers into the hands of kids around the world, and to teach them to code.
Since its initial launch, it’s become the most popular computer for DIYers who want to make their own electronics projects, from PLEX Media Servers to Retro Video Game Systems to VPN Servers and more.
The Raspberry Pi has gone through several iterations since its launch in 2012. The newest version is the Raspberry Pi Model 4. For $35, you get a caseless computer that includes an HDMI output, up to four USB ports (2 of which are USB 3 spec), Wi-Fi, and Bluetooth.
It runs a Debian based Linux distribution called Raspbian as well as a handful of other low-power operating systems.
Raspbian is the operating system most people will want to start with, so it’s the one we’ll detail how to install here.
.
What You’ll Need
◉ A Raspberry Pi: As noted the Model 4 is the newest generation of the Pi and it’s the one recommended to buy since the price was kept the same as previous models at $35 but offers better specs. Amazon Link
◉ An HDMI television or monitor: You’ll need to connect your Raspberry Pi to a display, which means you’ll need an HDMI-enabled screen of some kind. When everything is set up you can then use your Pi as a headless computer using SSH.
◉ A USB keyboard and mouse: In order to control your Pi, you’ll need a keyboard and mouse. At this point, pretty much any USB keyboard and mouse will work.
◉ An 8GB MicroSD card or greater and card reader: Instead of a hard drive, you install the Raspberry Pi’s operating system on a MicroSD card. Depending on your use case you’ll want at least an 8GB card for this. Class 10 or UHS Class 3 cards are recommended as they offer the best performance.
◉ A power supply: The Raspberry Pi is powered by a USB-C port, much like the one you’ve likely used for your phone. If you are using an older generation Raspberry Pi note that those use a micro USB port. Another thing to note is that you must use a charger that can provide 5.1V/3A which corresponds to ~15W charger.
◉ A computer: You will need a computer to download the Raspbian OS and transfer it to the MicroSD card.
Once you have all the above, it’s time to set it up.
.
Step One: Download & Install Raspbian on a MicroSD card
First things first, you need to get Raspbian onto an SD card. This means you’ll need to download the operating system on another computer and transfer it over to an SD card using an SD card reader.
It’s recommended to format your SD card first. You need to make sure you format the card as FAT32. You can use this application to simplify the process if you are unfamiliar with partitions and formatting.
Now it’s time to transfer the OS to the card. Thankfully the Pi Foundation made the whole process stupid simple with the release of their Raspberry Pi Imager software. Once installed just insert your MicroSD card in your PC and choose which OS you want to download (Raspbian is the recommended option) and transfer to the card using the app.
Advanced users can do the process manually by downloading the Raspbian OS image in zip format from here and then using an app like BalenaEtcher to write the image to your SD card.
That’s it. You’ll do the rest of the work on the Raspberry Pi itself, which means it’s time to hook it up to your monitor.
.
Step Two: Hook Up Your Raspberry Pi
Connecting all your devices to the Raspberry Pi is very easy, but you want to do it in a specific order so it can recognize all your devices when it boots up. First, connect your HDMI cable to your Raspberry Pi and your monitor, then connect your USB devices. If you’re using an ethernet cable to connect to your router, go ahead and connect that as well.
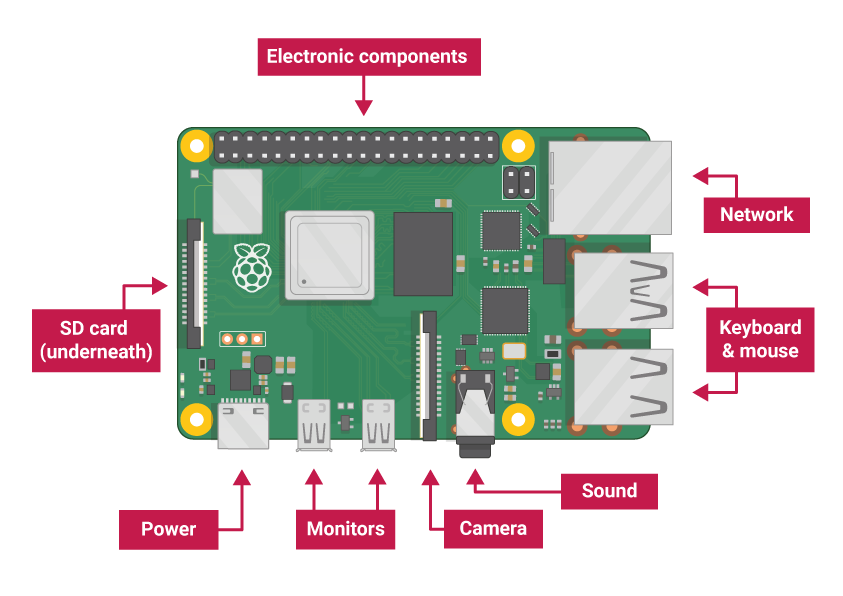
Finally, once everything is connected, go ahead and plug in your power adapter. The Raspberry Pi does not have a power switch, so once you connect the power adapter, it’ll turn on all by itself.
.
Step Three: Configure Your Raspberry Pi
If everything went smoothly you should be booted into Raspbian OS.
Congratulations, your Raspberry Pi is basically ready to go. In Raspbian, you’ll see a start menu where you can select applications, open a file browser, and everything else you’d expect from an operating system.
First though, you’ll probably want to set up your WiFi connection and any Bluetooth devices you want to use.
Connecting to your WiFi network works the same in Raspbian as it does on any modern operating system.
Click the network icon (it’s the one with two computers) in the top right corner.
Select your WiFi network name and enter your password.
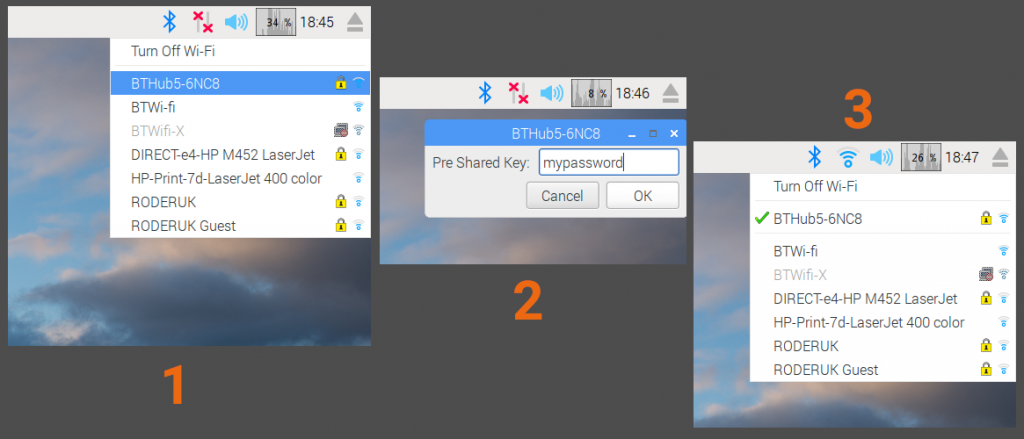
That’s it, you’re now connected to WiFi. This will work in both the command line and in the graphical interface, so you only need to set it once.
If you have Bluetooth devices, like a mouse or keyboard, that you want to use with your Raspberry Pi, you’ll need to pair them with your Pi. This varies a bit depending on your device, but it’s a straightforward enough process:
Click the Bluetooth icon in the upper right corner.
Click “Add Device.”
Find the device you want to pair, click on it, and follow the on-screen directions to pair it up.
.
Optional Step: Setup Remote Access
While the Raspberry Pi is a fully-fledged computer that fits in the palm of your hand and costs just $35, the added requirement of needing an HDMI monitor and a USB keyboard and mouse bumps up both the cost and the space required to have everything setup as a PC.
Thankfully, you do have ways to connect to the Pi remotely and have it setup somewhere around the house a headless server of sorts.
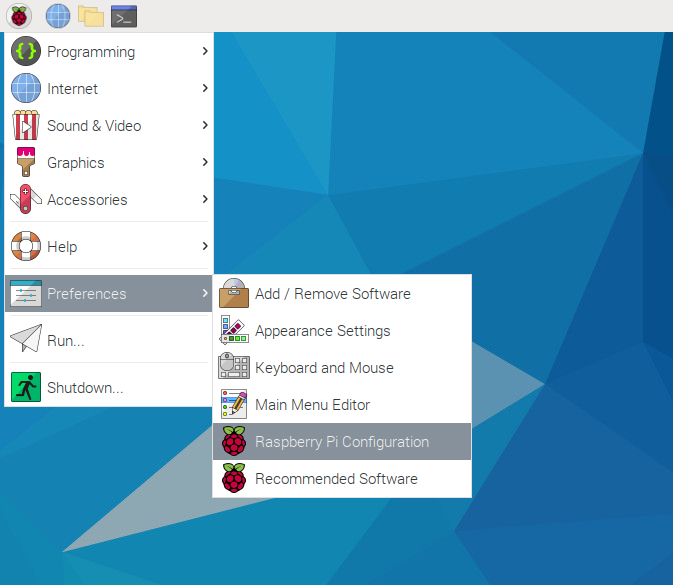
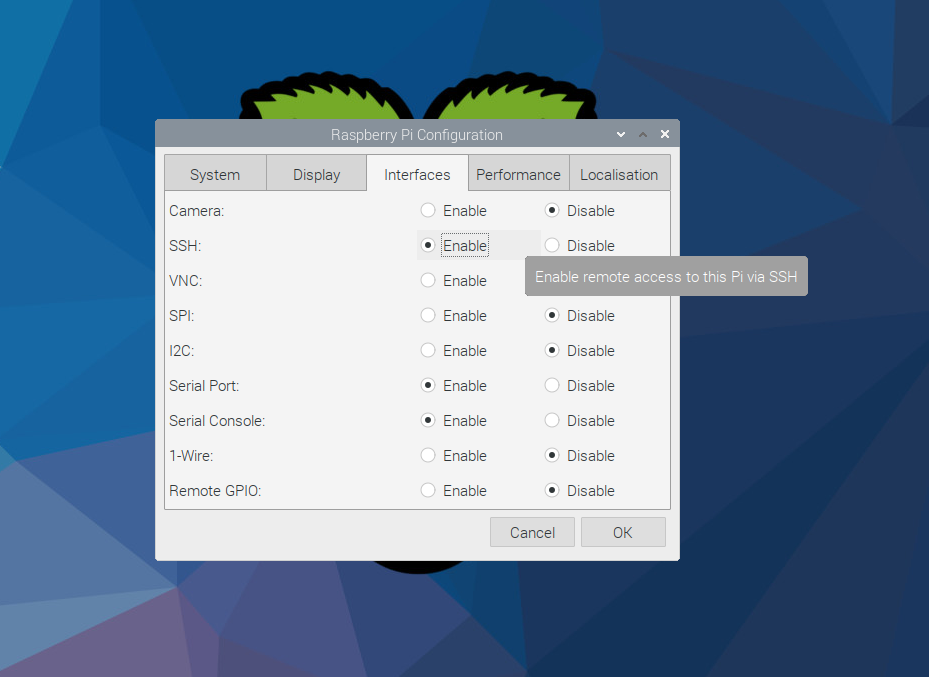
Connect to the Command Line Through SSH: You can connect to your Raspberry Pi’s command line interface using SSH from any computer. While you won’t get a graphic interface, you can run any type of command from the Terminal application on another computer and it’ll execute on the Raspberry Pi. If you’re working on a project that doesn’t require a screen, this is a great way to connect to your Raspberry Pi without a monitor, keyboard, or mouse.
To do this just select the Raspberry Pi Configuration application from the Applications Menu and enable SSH. You might need to restart your Raspberry Pi for the changes to take effect.
If you wish to enable remote access outside your home network you might want to look into Port Forwarding and also setting up a Dynamic DNS address to replace the IP assigned by your ISP which changes and will render your host unreachable.
Use RDP to Use Your Home Computer as a Remote Screen: If you do need that graphical interface, you can use RDP (Remote Desktop Protocol) to get it. You’ll see the desktop of the Raspberry Pi in a window on your desktop computer and you can control it as if you’re sitting in front of the Pi itself. If you only own a laptop or an all-in-one desktop, this is a way to use your Pi remotely. It’s not great for everyday use because it’s a little slow, but if you just need to get some things set up and don’t want to buy extra accessories, RDP is a way to do so.
You can follow this post to familiarise yourself with RDP. It will also help if you set up your Raspberry Pi to have a Static IP so that you don’t have to hunt down the IP address assigned to it by your Router every time you want to connect to it.
Setting up and installing Raspbian is just the first step with a Raspberry Pi. Once you’re done with that, it’s time to really start digging into it and making something new. Google is full of ideas for projects to take your Raspberry Pi to the next level.
Also the Beginner’s Guide to Raspberry Pi is an excellent source of information. You can download the electronic version for free here.